How To Build Your Own Website
By C4C and MULTI
For people unfamiliar with mkdocs and it's powers, this is pretty extensive
Git Overview
Clone
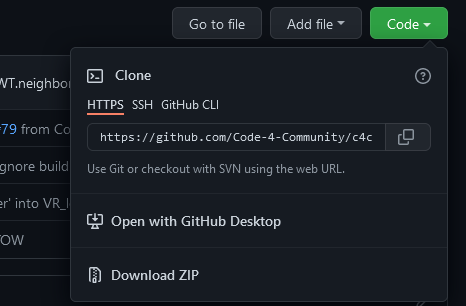
You can clone a repository by going to the repo's page;
What's a repository? It's a directory or a storage space where your projects can live. Every time you create a Git project, there will be a
./gitfolder which keeps track of all your changes and builds your work history over time. If you delete the./gitfolder, your project's history will also be deleted.
There, you will see different buttons, including a green button labeled "Code." If you click on it, you are able to access the repository's link and can copy it by clicking on the button right next to the link, or selecting and copying the link manually.
Once you are at your dev environment (for today we're using Visual Studio Code), we can open a terminal (from the top menu) and type in git clone [repo address] like the picture below and hit enter.

Pull Requests
At it's core, a pull request answers the question: "What did you change?".
A pull request is an event where you submit code contributions in order to merge them into an ongoing project. Pull requests allow you to request feedback on your changes, contribute to source code that you don't own, and make it clear what you changed. Pull requests create a formal process of reviewing code before we submit to prevent any breakage.
Before creating a pull request, the first thing you have to do is create a branch. A branch is a copy of the original source code that you can change completely without affecting the master. The default branch name in Git is master. You can create a new branch by typing:
git checkout -b nameofbranch
This will switch you off of the master branch and also create a new branch named "nameofbranch". After, there will be a message confirming that you have switched out. Now you can start making edits on the new branch that you have created.
Once you have finished making changes, you create a pull request to ask for reviewers (you can review your own changes if working independently!) to look at the changes to request them or approve them. Pull requests allow us to look at the source code side-by-side from what it was to what it is proposed to be, so we can understand the implications of what we are trying to change. If a pull request is approved, the branch you created is merged into the master and your changes become part of the new source code.
Commiting Changes
To locally save changes that you've made, the changes have to be added and committed. Adding “stages” changes, i.e. it stores your changes in a temporary location that will be included in your commit. Add each file you've changed one by one with
git add nameOfFile.js
You can use git status to see a list of files that have been "staged" or "unstaged", be sure to add each file that you want to include in the commit.
Once you've added all your files, you're ready to commit. Committing is how you save changes that have been added.
One of the most important parts of a commit is the commit message, a short note that gives a broad summary of the changes you've made so that your future self and other contributers can easily understand it.
Try to keep commits small and simple enough to describe with one short commit message. To commit with a message, run
git commit -m "write your commit message here, right after the -m flag"
Now that your changes have been saved locally, the next step is pushing changes to the remote repository.
Pushing Changes
After we have commited the files that you have staged in your local repository, we want to specify the remote repository URL where your local repository will be pushed. We can type:
git remote add origin "url"
Now we can push the code in your local repository to GitHub using:
git push -u origin master
You will be asked to enter your username and password. After, you can go to GitHub to view the files in your repository that you successfully pushed!
GitHub Pages
GitHub Pages is the easiest way to host your website! There's 2 ways to host your website.
- Name your public repository your username. This will automatically host your website on [username].github.io.
- Go to the settings page of your repository and enable GitHub pages. This will host your website on [repo_name].github.io.
Changing the URL requires you to purchase a domain name. There are many vendors out there, and a quick Google search will give you many options. Once you've purchased a domain name, there's 2 steps to changing the URL.
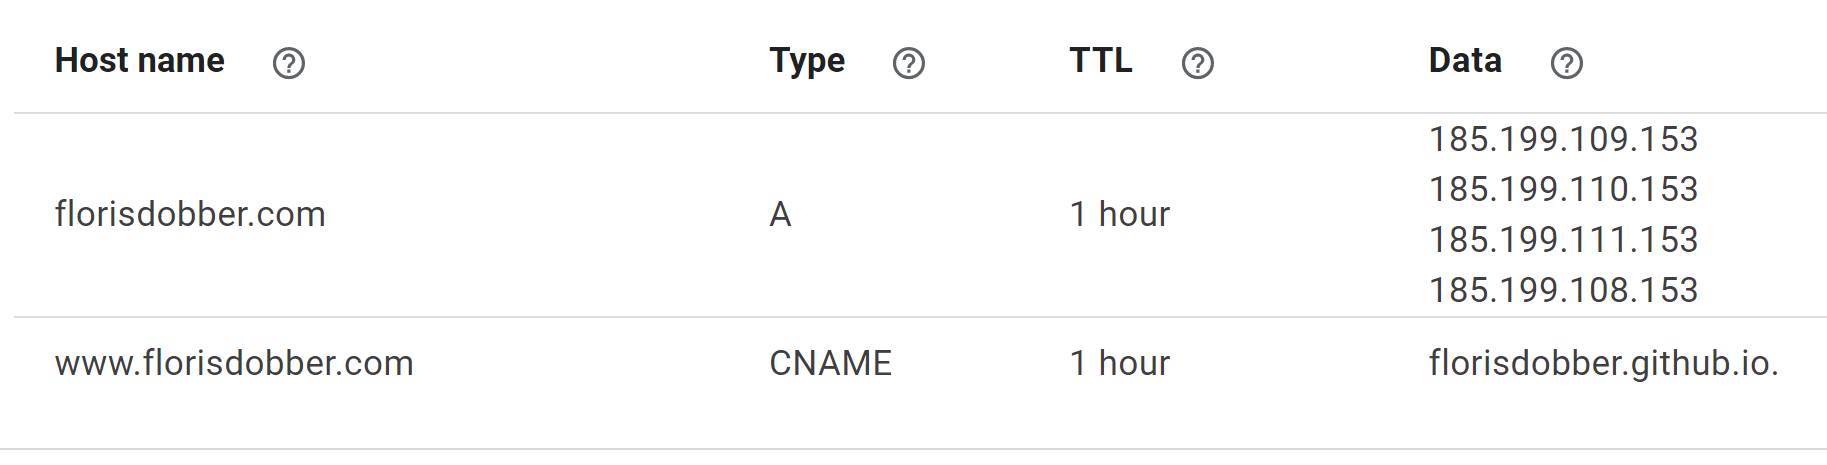
- Add CNAME record to your repository. It will look something like this.
- Change your DNS settings by adding custom records. This works differently depending on who hosts your domain. See below for an example of the settings for GitHub. The only thing you have to change is the host names.
Setting Up Your Profile
The repository [username] is a special repository. As described above, it has GitHub pages automatically enabled, but it also does something else. The README.md file will appear on your public profile! This is a great way for you to easily customize your GitHub profile and connect with people that are checking out your code (recruiters). (Here is an example of what it looks like) It's literally as simple as creating a repository with the name set to your GitHub username and then editing the README.md..
HTML + CSS
TODO for RYAN - include how you can double click on an html file to open it on the browser
Setting Up the Dev Environment
My personal preference for front-end web development is Visual Studio Code. Once you open that up, navigate to the GitHub folder on your local machine and open it. Now you should be able to open and edit all your files. Viewing your website locally should be as easy as navigating to the folder containing your index.html file and opening the file in your preferred browser. Saving your code should refresh the page automatically, but you might need to manually refresh the page in the browser.
Additional Resources
Github Guides - https://guides.github.com/
Short and easy articles on using Git professionally
Git-it - http://jlord.us/git-it/
Step-by-step guide on Git
Git & Github in a Nutshell - https://codeburst.io/git-and-github-in-a-nutshell-b0a3cc06458f
Quick review of terminology & commands