Working Through a Backend Ticket
Info
This document is still a work in progress.
Hey there! If you're reading this, you're probably pretty new to C4C, or you're refreshing on how to tickets. In either case, I'm glad you could stop by to read this document. Here, we're going to go through the basic process of doing work on a ticket. A lot of this will probably be common sense, but I still want to get it down so that there will be no confusion in the future. For the purpose of this document, we'll be working through a ticket on the Backend Scaffold. If you have any questions, especially on this, please reach out and ask. Good luck on your tickets!
Agenda
- Reading Through Your Ticket
- Planning
- Project Structure
- Model, View, Controller (MVC)
- What will we need to do?
- Making Changes
- Modify the API specification
- Create a new notes DTO
- Create a notes processor interface
- Create a notes sub-router API and note endpoint
- Create a new database migration
- Create a new notes processor
- Testing!!!
- Making the Pull Request
Reading Through Your Ticket
Okay. You've gotten your ticket, but now you need to figure out what to do. While the title is probably a good indication of the general purpose of the ticket, there are probably nuances and fine-print details you won't discover until actually reading through the description or implementing it. Therefore, the first step you'll want to take is to start reading through your ticket.
Make a note of any questions you may have, and reach out to your tech/project lead as soon as you can. Since they might have a day off or may not get to Slack messages until later, you'll want to get questions out to them as soon as you can so that they can answer them when they get a chance. Again, the sooner you can do this, the better, since you don't want to get deep into your project only to find out you're doing it all wrong. Remember, there are no stupid questions. However, if you think you have a pretty good idea of the ticket's requirements, don't worry about starting it. It's completely alright to start work you don't need answers to any questions, or the answers don't block progress (require an answer before you can confidently work).
For the purpose of this document, we'll assume the following is our ticket.
Title: Create a Note!
Description: Currently, there is no way to add a new note to the database. We want to be able to add a note through a REST API and have it be stored in the database.
Points: 3
Definitions
Here are a couple of definitions in case you haven't seen them before.
- REST: A set of principles for designing web applications.
- API: Application Programming Interface. How one application can communicate with another. In the case of Jumpstart, when we mention API, we're referring to the way that our frontend application can make requests to the backend. This is managed by the api/ module in the backend repo.
- Database: A program that enables simpl management of atomic data (numbers, dates, text...).
- Points: Usually when working using Agile methodologies, tickets, or tasks, are assigned point values representing the amount of work that's expected.
- Agile/Scrum: A set of principles for developing software efficiently.
What are some questions you may have for your project/tech lead?
- What is a note? What fields/properties should a note have?
- A note is a data type a user will be relying on to remember information. Notes have a date for when they were created, a title, and a body.
- There's no mention of getting the note through an API, is that part of my ticket?
- Nope, it'll be completed in a separate ticket.
- When you mention date from question 1, does that mean a date or timestamp?
- Since a timestamp contains information about the day and time, let's use that.
- You mention that a note has a timestamp, title, and body, but is it alright to add
extra fields for other data I might need? Like a user id to match the note to?
- Sure.
More questions may come up later, so don't spend too much time trying to get every last question answered before starting your ticket. Again, it's alright to start work on the ticket as long as there are tasks which don't require answers.
Planning
Read this if there are a lot of differences between the backend-scaffold and what we're describing
At the time of writing this document, the backend-scaffold's master branch is at
8ecc8893415e145ddfb738151a431e3beb4842e7. You probably won't have to worry about
that at all, but if you're seeing major discrepancies between what we're describing
and what you're seeing, it might make it easier to check out that commit and work
off of that for a while. If you don't know what that means or how to do it, ask
your supervisor to help.
To start off, let's take a look at the backend-scaffold. Here's a quick overview of what you're probably seeing. Open up the Backend-Scaffold project and work through the exercises locally as you read through this document.
Project Structure
- api/ is a directory handling routing information and data transfer objects (DTOs).
- common/ is a directory contaning useful methods and classes for general use cases. This can include things like authorization, passwords, logging, properties, ....
- persist/ is a directory for handling and saving data.
- service/ holds the main method for your project, so you'll start it up from there. It handles connecting everything together and basically 'running' your project.
- .gitattributes is a file with git configurations that are project-specific.
- .gitignore is a file containing regular expressions to describe files we don't want Git
to keep track of when we make commits or push to GitHub.
A regular expression (regex) is a syntax used to define text matching the given pattern. Check out regexr and regex101 for some common regexes, descriptions, and a playground to test some out.
- .travis.yml is a file for handling continuous integration and continuous deployment (CI/CD) setups for our projects.
- copy_properties.sh contains a shell script for copying properties during a CI/CD build.
- deploy.py is a Python script also assisting with deployment after a CI/CD build.
- Dockerfile is a file describing how to build an image of this program for containerization.
- pom.xml is a file with project build instructions, dependencies, and other project information.
- README.md is sort of like the introduction file. It's written in a format called Markdown (the .md filetype), which allows for simple and easy formatting. Usually this file has descriptions of the software, instructions for setting it up, and any other information the developer(s) would like to provide to the end user.
You might not end up working with a lot of these files (mostly just the files in the four modules: api/, persist/, and service/), but it's still super useful to know what they do. Now let's take a look at the structure of a basic module.
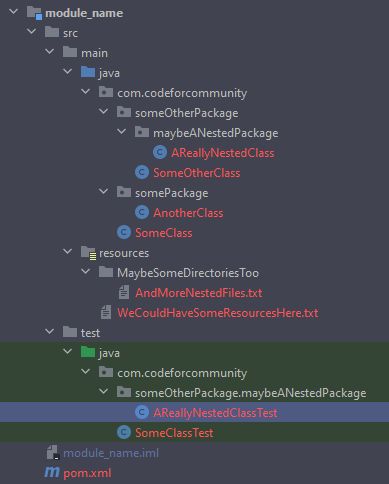
Firstly, you should notice that there's another pom.xml here. There is a difference between the pom.xml in the root of the project and the poms for each of the modules. The root pom defines project setup, dependency versions, and plugins, while the module poms actually include the dependencies needed. Pretty much everything else you will work with lives inside the main/ and test/ directories in src/. Going even deeper, all the actual java files are in the com.codeforcommunity package. The resources/ directory (which isn't required), contains files that may be used by the application, like configuration files.
Here's a more in-depth description of what the four modules actually do.
Model, View, Controller (MVC)
The api module is where all requests will enter through. It is the way that any external clients will interact with and view the results of our application.
The common module is what handles authentication, properties, session management, emails, and logging. It's kind of weird that we have an extra module for this, since all of this can probably just go in the service module, but we pulled it out since this code rarely changes between projects, unlike all other modules.
The persist module is where all persisting information will live. It's the location of our jOOQ database object relational management classes, so all interactions with the database take place in there.
The service module is what unifies everything together. Since we want to avoid making the persist and api directories dependent on each other, there will end up being a few interfaces that are made available and implemented in service.
If you've heard about it in Object Oriented Design (OOD) before, this follows the Model, View, Controller (MVC) design pattern. Persist is our model, api is our view, and service is our controller. For those of you who don't know, this basically just separates out functionality into three different main functionalities.
You can read more about it here.
- Model: deals with handling the data and functionality with processing data
- View: deals with presenting data (whether visually, textually, or in any other way) in a way that an external entity (like you or another program) can understand what is happening and interact with your program
- Controller: deals with linking up interactions between the model and view, and is the mastermind behind running your program and handling external entity interactions (like you clicking a button or something else sending requests)
What will we need to do?
Alright so, we know that we need to add a way to create a note, but what does that actually entail? There are two main things that are required: 1) creating a way for something to request the creation of a note, and 2) actually storing the note in the database. Our database up to this point doesn't really have much in it, so that means we'll have to create a database migration SQL script so that the database knows what to expect. We also don't have any concept of notes in our API, so we need to add the creation of a new API sub-router to our growing list of tasks. And since we haven't handled notes in either the API or database before, there aren't any ways to handle the note once a request is received and pass it to the database, so we'll need to create a processor implementation. Let's list all of this out.
- Modify the API specification
- Create a new notes DTO
- Create a notes processor interface
- Create a notes sub-router API and note endpoint
- Create a new database migration
- Create a new notes processor
That might seem like a lot to do, and it is relatively complex compared to writing a single method which gets a request and inserts the new note into the database, but this allows for a much cleaner code structure. You'll also get pretty used to doing this after a while, so you'll come to realize it's actually not that bad. Also, in most cases, you won't need to create a new sub-router, processor, or database migration, so future tickets could be much simpler. In fact, if you decide to create the get note endpoint as a followup ticket, you'll be able to see that for yourself.
Let's see how to actually make these changes.
Making Changes
Before you even start making changes, you'll want to check out a new branch for your feature in git. You can
do that by running git checkout -b <branch_name>, where branch_name is usually descriptive of what you're working
on. For example, we'd probably want to run git checkout -b add-notes for this branch. Some organizations
also like it when you add your name or initials to the branch name, like cn.add-notes, cn-add-notes,
CN-add-notes, ..., so you can do that too if you prefer. You should ask your team lead for their preferred method
of branch naming before you start working. If you haven't used git before, be sure you check out
the Jumpstart Git Workshop before working on a ticket.
Modify the API Specification
The very first step you'll want to take before diving into the development work of your ticket is to modify the API specification for your project. Usually you'll find one of those in the c4c dev docs repo under the project's directory, but since the backend-scaffold doesn't have one, we'll just go through the process of doing that here. The general structure of an API spec looks like this:
1 2 3 4 5 6 7 8 9 10 11 12 13 14 15 16 17 18 19 20 21 22 23 24 25 26 27 28 29 30 31 32 33 34 35 36 37 | |
Generally, when you're updating the API specification, you'll want to update the table of contents and add
the note in at the spot where it fits best. More sections can be added, and sections that aren't used can
be removed, so try to thoroughly document the API updates as you see fit. Path and query parameters may also
show up in the spec, and you'll usually see those denoted by a colon (:) preceding the parameter name.
Path parameters
The colon in front of a part of the path represents a variable that can be inserted. For example,
with GET /api/v1/protected/notes/:note_id, the :note_id param can be 1, 2, ... and so on, and
that :note_id value can be retrieved later on. It could look something like this:
GET /api/v1/protected/notes/1.
Query Parameters
A query parameter is information that can be appended to a request. It begins
with a question mark (?), and multiple values are separated by ampersands (&). The above query param can
be done like this: GET /api/v1/protected/notes/:note_id?raw=true, where raw=true has the key/value pair
raw set to true.
Create a new notes DTO
You may have heard or seen the term "DTO" before. A DTO, or Data Transfer Object, is a class whose only purpose is to hold information and transfer the information between different places. They are exactly comparable to the JSON bodies available in the specification. Let's go through the process of creating a new Notes DTO.
If you look in the api/ module's com.codeforcommunity.dto package, you can see some of the classes that have
been created for DTOs. You'll notice a couple of packages within for groups of DTO types, as well as an ApiDto abstract
class, which deals with defining DTO validation for incoming data. The DTO we're about to create, which will deal with
handling incoming note JSON objects, will utilize ApiDto for ensuring some of the properties we guaranteed in
our persist/ migrations. Since the other classes we see in the dto package house DTOs in packages referring to
the data type's name, let's do the same for notes; let's create a note package. In there we'll create a
CreateNoteRequest DTO. The following is what the CreateNoteRequest DTO will look like.
1 2 3 4 5 6 7 8 9 10 11 12 13 14 15 16 17 18 19 20 21 22 23 24 25 26 27 28 29 30 31 32 33 34 35 36 37 38 39 40 41 42 43 44 45 46 47 48 49 50 51 52 | |
As you can see, it basically just has getters and setters, as well as a validateFields(String) method, which
you can use to define whether or not a given field is valid or not. If it's not valid, you can add the field name
to a list which gets returned from the method, indicating the fields which have an invalid value.
If you saw in the list of questions we had for the tech lead earlier, you've probably noticed that there are a few
fields missing
from the DTO that we'll need for the database. Two of them, the id and date fields, will be handled for us
by the database. The SERIAL value we added to modify the id field tells the database that it can
automatically set the value using an auto increment, so each insert will have the id of the previous entry
+ 1. Similarly, we manually set a DEFAULT on the date field to automatically enter the current timestamp
as a value for that field (unless explicitly specified, but we won't be doing that).
The other field, user_id, can be retrieved from methods provided later on,
so it's not something that has to be included as part of the request. You also wouldn't want to include that
as part of the request because then people would be able to set notes as other people! Make sure you pay attention
to where you get user information from, and ensure you're not introducing possible bugs or security issues
into the application.
We're all done with the DTO now, so let's take a look at the processor interface, which will tell the api/ module what it can do with notes.
Create a notes processor interface
Now we need to create what's called a processor for notes. In C4C, we use the term processor to define a class which deals with the interactions between an API and jOOQ type, both for incoming and outgoing data.
Each module in a project is compiled separately of each other. Because of this, if you want to include a module's classes in another module, you have to include it as a dependency on that project. If you take a look at the pom.xml file in service/, you'll notice that the api/, persist/, and common/ modules are all included in the dependencies list. Let's make an interface in api/ that will provide a method signature to the routers we've been working with created.
We're able to create a new interface in api/, which will give the new NotesRouter class we created an idea
of what can be done in the service/ module. This interface can then be implemented by our processor in service/,
since service/ will have access to all public classes and interfaces available in api/. Let's create that interface
now in the api package of api/. We'll want to include a method in there that knows what to do with
CreateNoteRequest DTOs. The method we create will also want to take in some user information too,
like a user's id. We'll just pass that in as a String. We don't really need any information back, so we
can make that method's return value void.
1 2 3 4 5 6 | |
Super simple, right? Now we can create our notes sub-router and endpoint. You can do that in the
com.codeforcommunity.rest.subrouter package.
Create a notes sub-router API and note endpoint
Now that we have an idea of what we'll be able to do, we need to create a way for the backend to receive the information
provided with the request, add it to the CreateNoteRequest class, and pas it into the createNote method defined
in the previous section. If you want to read more about routing, you can check that out
here. Let's jump into the code.
The Sub-Router
Here's the code for a sub-router for handling notes. You'll want to create this in the api/ module, under the
com.codeforcommunity.rest.subrouter package.
1 2 3 4 5 6 7 8 9 10 11 12 13 14 15 16 17 18 19 20 21 22 23 24 25 26 27 28 29 30 31 32 33 | |
On the first line, you can see that this class implements IRouter. This interface provides a single method for
initializing the router with a Vertx instance, and you can see that that initializeRouter method is overridden
below. We'll come back to that in a second to discuss exactly what it's doing. Next up, we have an
instance of the INotesProcessor declared as a private final field, which is provided through the constructor.
1 2 3 4 5 6 7 8 | |
Taking a look at the initializeRouter method, we can see that it takes in a Vertx instance. Using that Vertx
instance, it gets a new Router from Router.router(vertx), and calls the registerCreateNote method below. Finally,
it returns the set up router. Let's skip down to the registerCreateNote method at the bottom
of the class next.
1 2 3 4 5 | |
This registerCreateNote method, as we saw earlier, starts by taking in a Router instance. With that Router
instance it does two things: retrieve an individual post Route for the /create endpoint in this sub-router by
calling router.post("/create"), and set the handler for the returned Route. In cases where we want to perform
another HTTP operation, we could call router.get(<route>) or router.<method>(<route>) instead. The handler()
method called on the Route takes in a
method reference, which is a type of
lambda available in Java. Method references tell route, and therefore the router, which method to call when the
route is accessed. In this case, we're having it access the handleCreateNote method. Let's wrap up the sub-router
code by taking a look at that.
1 2 3 4 5 6 7 8 9 | |
"Route handlers", or the specific types of method references that the handler method from before can take in, take in
a RoutingContext, provided by the Vert.x package, and don't return anything. That RoutingContext object provides
insight into request (like the body, path parameters, query parameters, ...), and allow you to respond to the request
when you're done. We'll later be registering this sub-router under a protected path, so we'll also be adding information
to it, like the jwt_data we get on the next line. The JWTData object contains secure information about the user,
such as their id, which we'll need for completing this ticket.
On the following line, we use a custom method in
RestFunctions to load the request body into the CreateNoteRequest class we created earlier. This
getJsonBodyAsClass method turns JSON into a class, and calls the validateFields() method we defined
under ApiDto. Now, we have all the information we need to hand the processing of this off to the INotesProcessor
the constructor took in, so we can call processor.createNote(noteRequest, userData.getUserId()). Now that processing
has been completed, we can end the request by calling the end() method (provided by the ApiRouter class), which will
prepare a response from the data passed in.
Note
RestFunctions.getJsonBodyAsClass only takes in DTOs that subclass the ApiDto, so that it can call
validateFields and make sure incoming data is as expected.
That wraps up all of the work we need to do to set up the sub-router, so let's take a look at how this is set up
in the ApiRouter class.
The ApiRouter
Let's now register our new NotesRouter sub-router with the ApiRouter class so that the new route can be called.
To that, we'll need to add a new private final NotesRouter notesRouter field, adjust the constructor, and
adjust the defineProtectedRoutes method. By the way, this class is already available in api/ under the
com.codeforcommunity.rest package.
1 2 3 4 5 6 7 8 9 10 11 12 13 14 15 16 17 18 19 20 21 22 23 24 25 26 27 28 29 30 31 32 33 34 35 36 37 38 | |
Info
The lines we actually added stuff on are 5, 11, 15, and 24.
In defineProtctedRoutes, we're doing something a bit interesting; we're initializing a new sub-router for the
CommonRouter, and registering the notesRouter and protectedUserRouer routers under it. Remember how earlier we
mentioned that the
JWTData object gets added to the RoutingContext automatically? Well, here's where it happens. Whenever a router
registered under the CommonRouter is called, a method runs to validate and insert that data, turning away anyone
who is not logged in. By calling router.mountSubRouter, we can chain these routers along, mounting them at a certain
paths on the parent router. The main ApiRouter is mounted at /api/v1/, so all routers registered under it have their
routes appended after the /api/v1/ part. For the common router, that happens at /api/v1/protected/. For the
new notesRouter, that happens at /api/v1/protected/notes/. Finally, our new create note path is mounted at
/api/v1/protected/notes/create.
The Database Migration
Next up, we'll be writing the database migration. If you remember from before, the persist directory is where the model part and database interactivity parts of our application are located. When you open the directory, you'll notice that there is no java/ directory located within src/main/. That's because we actually don't manually create any classes here. An external ORM dependency, jOOQ, manages that for us. Therefore, all of our files will be in the resources/ directory that was mentioned earlier. There's a config set somewhere that tells Flyway, another dependency for performing migrations, to look for the migration files in the db.migration directory. Flyway will run migrations that haven't been performed in the order of their version numbers the next time the project is built, and jOOQ will generate ORM classes for each table.
Danger
Remember that you can never edit a migration once it's been committed to master, or else environments that have already run that migration will either notice something has changed and delete all information in the database (which is really dangerous), or avoid running the change you made, which can put the database in a bad state and cause future migrations to behave incorrectly or fail. Also, do not add a migration with a version number that is less than or equal to any already existing migration versions. This will also end up deleting any database information, which is very bad.
Definitions
- Migration: A SQL script defining modifications to a database. They're often done in separate steps as migrations rather than as one single large SQL script because you can avoid deleting information in the database, especially in a production environment. Therefore, each of these migrations describe the changes to get the database's structure updated from the previous migration.
- Object Relational Mapper (ORM): A library that generates a method of working with incompatible type systems (Java objects and SQL database tables in our case) natively from one syntax. In our case, it allows us to write SQL queries using Java classes and interact with classes as if they were an object.
Let's take a look at the already existing tables in the database. If you've run mvn or mvn install before,
and the build succeeded, you should be able to see the following tables in whichever data viewer you're using.
blacklisted_refreshes: Contains a list of invalid verification key hashes so that the keys can be invalidated when a user logs out.flyway_schema_history: The current migration status for Flyway, so that it knows which migrations should be applied on a build. This table isn't created in a migration file, it's created automatically for us by Flyway.users: a table containing user information.verification_keys: Session information for a user.
Info
You can feel free to use whichever data viewer you would like. We recommend against using the PostgreSQL console directly (unless you need to for certain tasks), and instead think you should focus on using PGAdmin, the Database Viewer in IntelliJ, or the JetBrains DataGrip.
We're going to want another table, notes, to store notes for a use. If you know SQL, try creating one on your
own in a V2__Notes_Table.sql file in the same directory that V1__Initial_Import.sql exists in
(there are two underscores between V2 and Notes). We'll have an answer in the dropdown below.
Can you write a migration for the notes table?
1 2 3 4 5 6 7 8 9 | |
- How do we run this migration in the database?
- How do we get jOOQ to create our ORM classes?
Fortunately, the answer to both questions is easy. All you have to do is run Maven! With migrations, you'll
want to run mvn clean install (a shorthand for this command is just mvn!), since sometimes issues can pop
up when jOOQ is constructing your ORM classes. Try it out, and then you'll be able to see that a NotesRecord
class was generated in the persist/target/generated-sources/jooq/... directory of the persist module.
If you get an error mentioning @Generated, read this!
If you're getting the @Generated error, that means the wrong version of Java was used with Maven.
To fix this, you'll want to make sure you're running Maven with the IntelliJ Maven tool. You should be
able to locate it at the top of the right toolbar.
1 2 3 | |
Cool, now we're done with working in persist/. Let's finish up the implementation details by creating the INotesProcessor
interface.
Create a new notes processor
Remember from earlier when we created the interface for the INotesProcessor? It should look something like this:
1 2 3 4 5 6 | |
Let's create an implementation for it now.
Create the Implementation
We're going to go through and implement it now. Go to the service/ package, under the com.codeforcommunity.processor
package, and create a new NotesProcessorImpl class. It should start out looking like this:
1 2 3 4 5 6 7 8 9 10 11 12 13 14 15 16 | |
In the constructor, and as a field, you can see we're getting and storing a DSLContext object. The DSLContext class
is what jOOQ (remember, our ORM from the previous section), uses as an entry point for interacting with the database.
With it, we can compose queries to do almost anything. In this case, though, we'll be using it to create a new
NotesRecord.
In the createNote() method we override, we first call db.newRecord(Tables.NOTES) to create a new record
for the NOTES table, which produces a new NotesRecord object. We can now proceed to fill in the required o
information, adding the information passed in with the CreateNoteRequest and userId by calling the setter methods
on NotesRecord. Once all of the required information has been added, we can call notesRecord.store() to
automatically compose a SQL query to add this record to the database. No SQL necessary!
Now that we have our NotesProcessorImpl, what do we do next? Well, we'll add the note to the database.
Earlier, you saw the NotesTable class that was generated for us by jOOQ. We'll use the db field to
get a new instance of NotesRecord, set the values, and then call NotesRecord.store() to save it to the
database. No need to write any SQL!
Let's wire this into the ApiRouter.
Provide the NotesProcessorImpl to ApiRouter
Finally, we need to instantiate this in ServiceMain so that it can get a DSLContext and begin processing
requests. We'll also need to provide it to our ApiRouter, so that it can properly set up the NotesRouter too.
In the ServiceMain.initializeServer() method, we'll create a new NotesProcessorImpl and pass
it in to the ApiRouter's constructor.
1 2 3 4 5 6 7 8 9 10 11 12 13 | |
Awesome! You're done creating and dealing with your processor. Let's test everything to make sure it works now.
Testing!!!
Testing is an extremely important part of the development process, as it ensures that the changes we are pushing don't introduce new bugs into the product. There are really only two modules that you really need to work on testing when working on a ticket: the service/ module and the common/ module.
The api/ module doesn't need to be tested because a lot of the logic should be extremely simple and handled almost entirely by Vertx, so testing whether or not routes are registered or calling the methods you expect will be immediately apparent when doing manual testing. In fact, the way we tested if the note was successfully added to the database in the previous section is a perfect example of how to test manually.
The persist/ module also doesn't need to be tested, since the only changes you should have to make there are to create database migrations. You'll be testing that module when you build your project and see the new migrations reflected in the database.
The createNote() method we created in the processor is a method that we should go through and test. Let's
create a new class in the test directory within service/. Your test directory should, in a way, mirror the main
directory containing all of your code. By that, I mean if the class you want to test appears in a specific package,
you'll want to place your test class in a matching package and name it the name of the class + "Test". For
the NotesProcessorImpl class, we'll create a NotesProcessorImplTest class in the com.codeforcommunity.processor
package.
Here's how your NotesProcessorImplTest should start:
1 2 3 4 5 6 7 8 9 10 | |
Once you have your NotesProcessorImplTest class set up, you're going to start by creating a field for storing
an instance of a NotesProcessorImpl. We'll have that automatically be set up for us by creating a method
with the @BeforeEach annotation; one that is used by JUnit so that it can be called before each test to
set up whatever information you need for your tests. We're using that setup annotation here because every test in this
class will be testing the NotesProcessorImpl. Therefore, it's useful to have it be set up prior to a test instead
of copying code all over the place to set it up the same way every time.
Since we were using an external dependency, jOOQ in that method, we need a way to mock its behavior since we don't
actually want to insert data into the database in a test like this. To do that, we created a JooqMock class
to handle testing methods which have jOOQ interactions in them. You'll also want to add that as a field to your
class, since it has a DSLContext that will be passed into the NotesProcessorImpl.
Now, let's go ahead and create our first test. Down below, add the following code:
1 2 3 4 5 6 7 8 9 10 11 12 13 14 15 16 17 | |
We can now start setting up the JooqMock for our test. Since we're only calling
NotesRecord.store(), we're not expecting a record to be returned (this isn't a SELECT operation).
Therefore, you can set up the JooqMock by telling it to expect to return nothing, which is done
by calling the JooqMock.addEmptyReturn() method. Since we're expecting an INSERT operation to occur,
we can pass in "INSERT" as the parameter for the operation. The JooqMock also has the ability to assign
a new id to the record when it's inserted, so we'll want to get that value and validate it later on.
Use the JooqMock.getId() method to get the value that will be used next.
Next, you can create a CreateNoteRequest and set it up with whatever values you're expecting.
Call NotesProcessor.createNote() with the CreateNoteRequest and a value you choose for a userId.
Let's start validating properties about the record that was created. There are two methods that you'll
focus on for this: JooqMock.timesCalled() and JooqMock.getSqlOperationBindings().
timesCalled() takes in an OperationType
for the SQL operation you're expecting, and returns an int representing the number of times that
operation was called. In this case we're expecting it to be 1.
Now we want to test some things about the information that would have been inserted into the database
with JooqMock.getSqlOperationBindings().
1 2 3 4 5 6 7 8 9 10 11 12 13 14 15 16 17 18 19 20 | |
getSqlOperationBindings() is a little bit more involved. The JooqMock records values that are inserted during
an operation, and saves them in a nested array of objects. Let's dissect it right now, since it may be
confusing to see at first. getSqlBindings() returns a Map<String, List<Object[]>>, and at the surface
level, it maps operations to a list of invocations. An individual invocation is the Object[] containing
the values inserted into the database, so the list of invocations comes into play when you call an operation
multiple times. Therefore, each value in the List<Object[]> represents the set of values the operation was
called with each time it was called.
The first thing we want to do with getSqlBindings() is verify that the length of the list for
INSERT operations is the same as the value for timesCalled(). We'll also want to verify that the length
of the underlying array is what we're expecting; that is, we want to verify that each of the values we added
to the NotesRecord was included, +1 for the id that jOOQ automatically adds for us. We do that with the following
part:
1 2 3 4 5 | |
Finally, we'll go through and check each of the values that were added there to make sure they're what we're expecting. For this, you may need to run your debugger and see what order they were added in, and then use the ordering you find in your tests.
1 2 3 4 5 | |
If we had more than one database operation occur during the test, we would also go through and test the following positions in the list of invocations in a similar manner. The test class should look like this in the end:
1 2 3 4 5 6 7 8 9 10 11 12 13 14 15 16 17 18 19 20 21 22 23 24 25 26 27 28 29 30 31 32 33 34 35 36 37 38 39 40 41 42 43 44 45 | |
If there were edge cases present or features of the method that weren't tested by the test we just created, then we'd go ahead and validate those too. Since that successfully tests the entire method though, we're done with testing!
Now we'll finish up our ticket by making sure everything is pushed to GitHub and starting a pull request.
Making the Pull Request
Alright, so you've read through your ticket, worked on the implementation, tested your code, and you're ready to merge it in. So now what? At C4C (and probably all of your co-ops), merging your work right when you're done usually isn't the best practice. Usually you'll want someone to look over your work and make sure your code works as expected for two main reasons: you'll want to make sure you're not introducing unintended side effects through typos and bugs you may have missed, and you'll also want to make sure it actually fulfills the requirements of the ticket. It's also a really good time to let someone else see if there are improvements that can be made to your implementation.
The way that these reviews are usually done is through a pull request (PR) on GitHub (or almost any git hosting alternative). The pull request tool is a convenient way to have a discussion about your work, request someone to review it, perform reviews, and run checks on your code to make sure it can successfully build.
You can open up a pr by viewing your branch in GitHub and clicking on the "Pull request" button on the upper right (it should appear right above the total number of commits). Once you do that, you'll have the chance to see the changes made in your code and add information about what changes you're making in the title or comment. After that, you can open the request by clicking on the green "Create pull request" button.
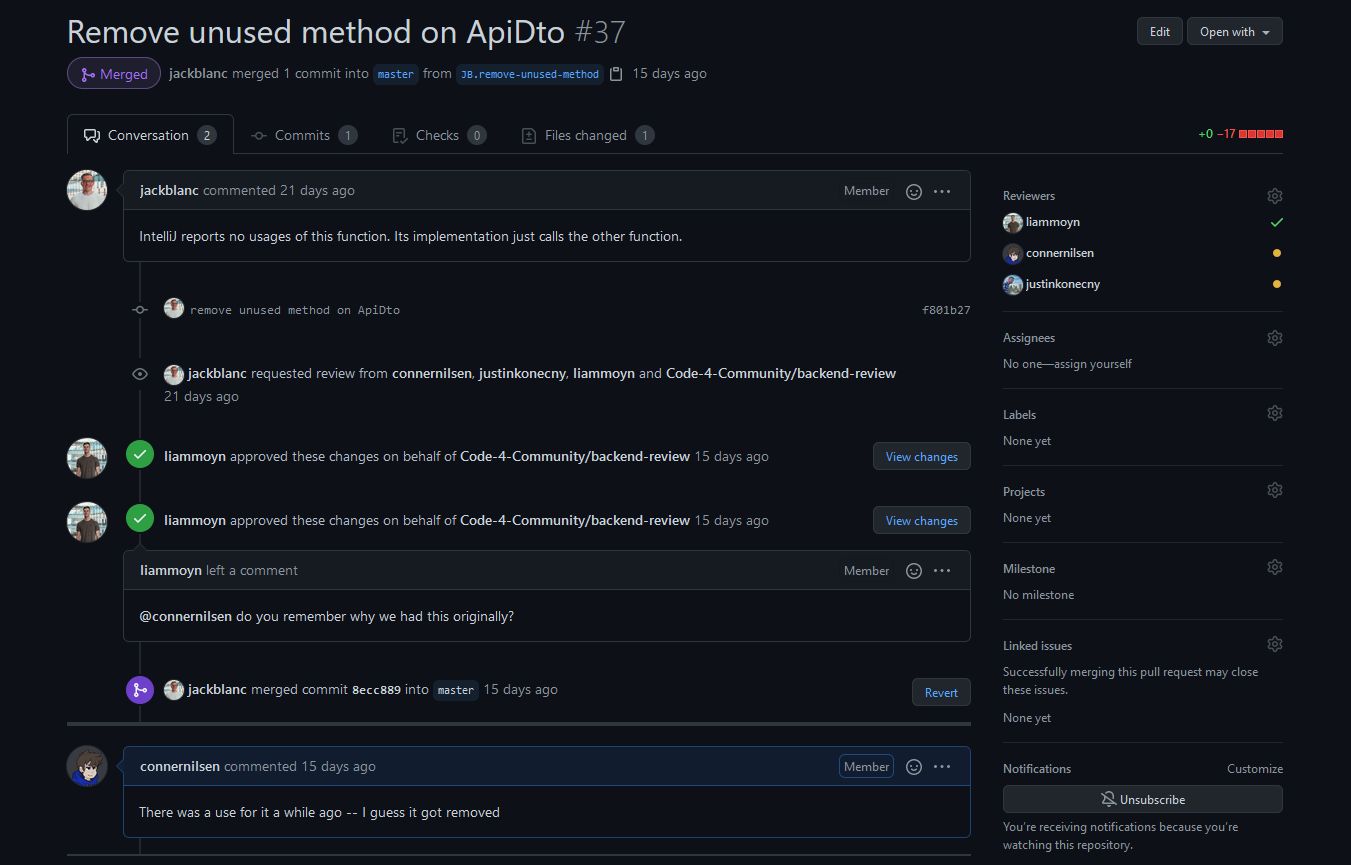
You from now on, you can access your pull request by visiting the repository and clicking on the "Pull Requests" tab at the top. The pr page should look a bit like this.
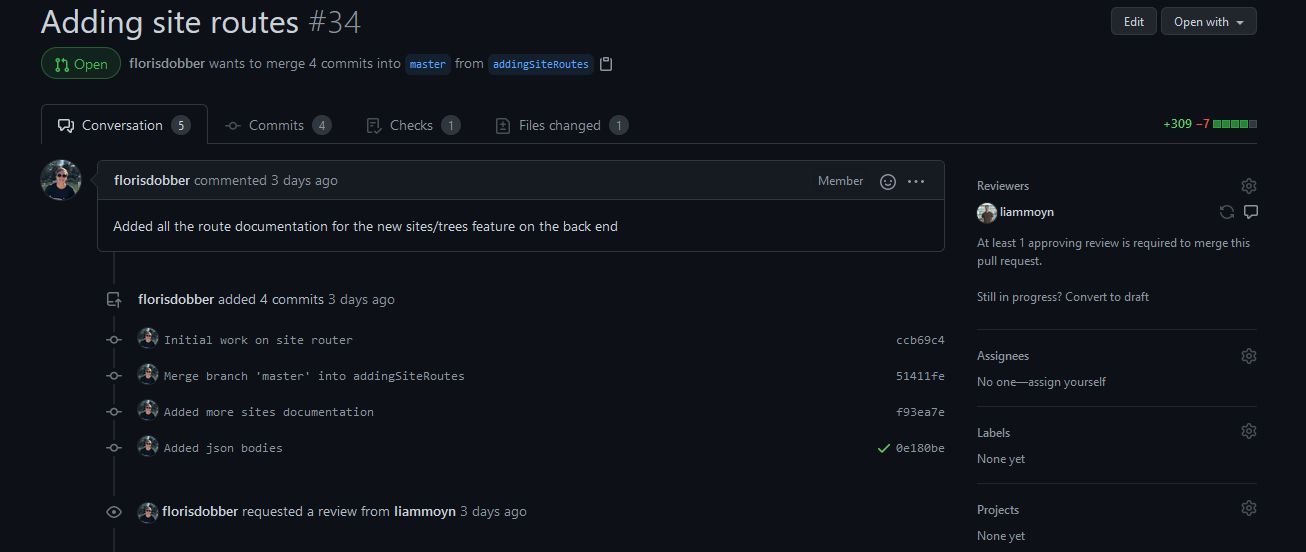
There, people can come and leave comments on your code.
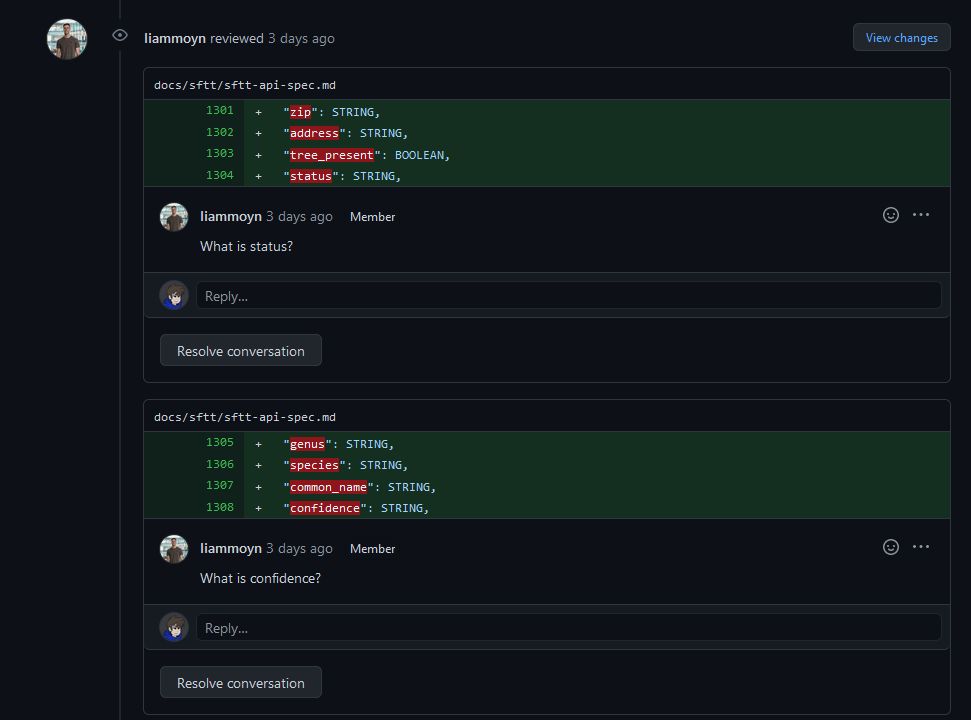
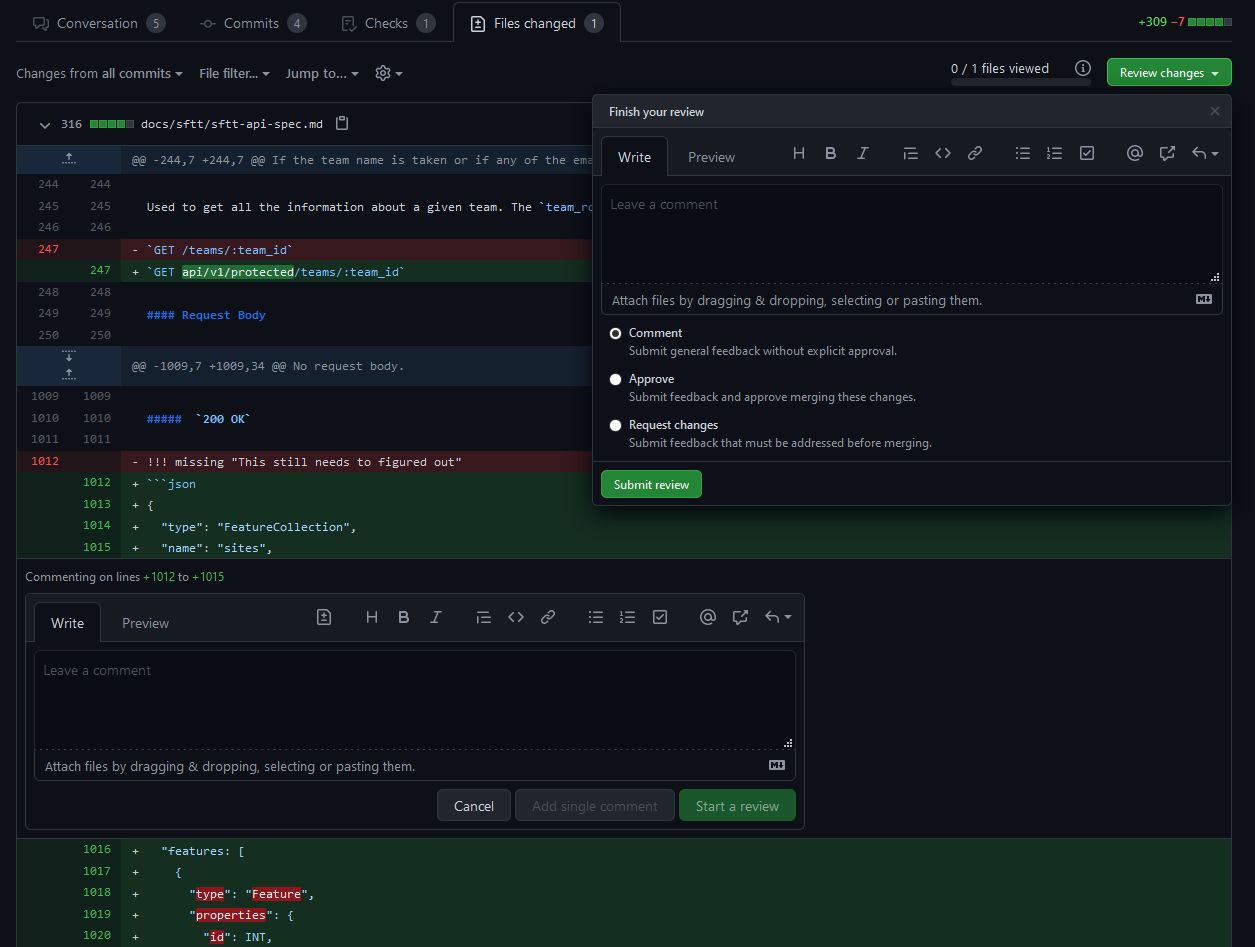
On the "Files changed" tab, you can see all of the changes made on your branch. People can also leave reviews, summarizing their opinions on the changes you've made. If they think the changes you made are good, then they can also approve. Otherwise, if there are changes to be made, they can submit reviews as either regular comments or requests for changes.
At this stage of the development cycle, you'll probably go through a couple of rounds of changes followed by reviews. You can just keep committing to your branch and pushing to GitHub normally, and your changes will show up for your reviewer(s) to see. Whenever you want (another) review, make sure you Slack them to make sure they're aware that you have something ready to be reviewed.
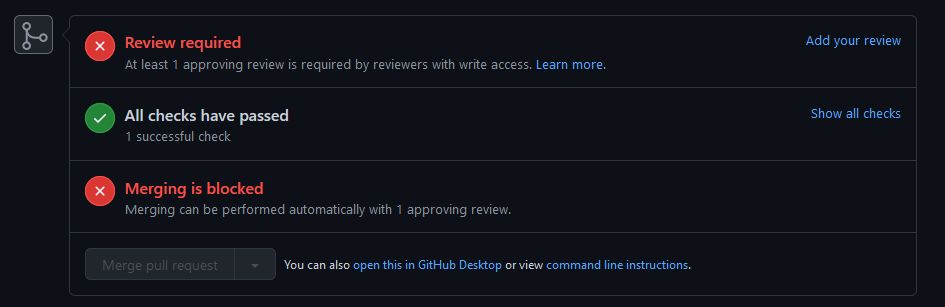
At the bottom of the main review page, you can see the status of your PR. You can see below that you are blocked from merging your request until two things happen: you get an approving review and all checks have passed. Before merging your request, make sure all comments have been addressed (either through discussions or implementations). Once you're ready to merge things in, and you have gotten both a review and passing checks, the "Merge pull request" button at the bottom of the status section will light up green. Click it, and your changes will be merged into master.
And that's it, you're done with your ticket! Be sure to click the button to delete your branch, and you'll be set.
If you have any improvements to make to this tutorial, please be sure to edit the doc (and make a PR for it)! Thanks for reading.